Like most people I download stuff from the web and often times when I have downloaded the file the file or folder is coloured green. The green colour on a file or folder in Windows usually means the file is encrypted or at least Windows thinks it is encrypted.

To remove that green colour from your folders and or files follow the steps below.
1) Right click on the file or folder and select "properties".
2) Once the properties window appears select the "Advanced" button located in the lower right hand side of the window.

3) With the Advanced Attributes window open uncheck the "Encrypt contents to secure data" and click "OK"

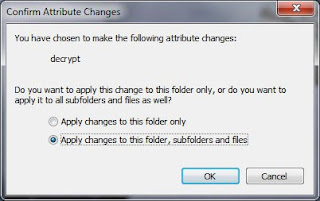
4) Back on the properties window click the "Apply" button. If you are working on a file click "OK" and your done. If you are working on a folder another window will appear asking you to choose to apply to either this folder only or to this folder and subfolders and files. After making your choice click "OK"
5) After clicking "OK" you will return to the properties window. Just click "OK" again and your done.
This step by step was done on a Windows 7 64 bit Ultimate machine. Other versions of Windows may require different steps or may not work at all.
Hope this helps. Please leave a comment in the comments section if you have any questions or anything to add.

To remove that green colour from your folders and or files follow the steps below.
1) Right click on the file or folder and select "properties".
2) Once the properties window appears select the "Advanced" button located in the lower right hand side of the window.

3) With the Advanced Attributes window open uncheck the "Encrypt contents to secure data" and click "OK"

4) Back on the properties window click the "Apply" button. If you are working on a file click "OK" and your done. If you are working on a folder another window will appear asking you to choose to apply to either this folder only or to this folder and subfolders and files. After making your choice click "OK"

5) After clicking "OK" you will return to the properties window. Just click "OK" again and your done.
This step by step was done on a Windows 7 64 bit Ultimate machine. Other versions of Windows may require different steps or may not work at all.
Hope this helps. Please leave a comment in the comments section if you have any questions or anything to add.
Comments
Post a Comment